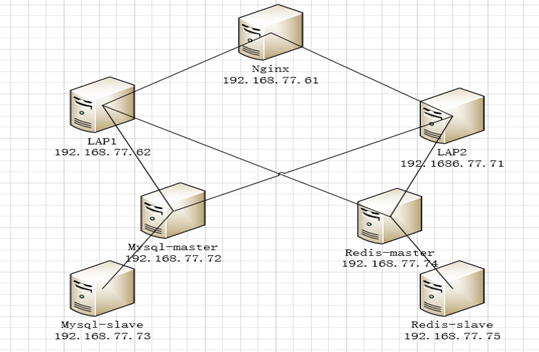
IP规划:
192.168.77.61(nginx)
192.168.77.62(LAP1)
192.168.77.71(LAP2)
192.168.77.72(mysql-master)
192.168.77.73(mysql-slave)
192.168.77.74(redis-master)
192.168.77.75(redis-slave)
拓扑图
Nginx安装:
[code]
yum install pcre-devel pcre gcc* openssl openssl-devel gcc* -y
cd /usr/src ;wget -c http://nginx.org/download/nginx-1.4.2.tar.gz
tar -xzf nginx-1.4.2.tar.gz
cd nginx-1.4.2 ; sed -i -e ‘s/1.4.2//g’ -e ‘s/nginx\//WS/g’ -e ‘s/”NGINX”/”WS”/g’ src/core/nginx.h
useradd www ;./configure –user=www –group=www –prefix=/usr/local/nginx –with-http_stub_status_module –with-http_ssl_module
make&&make install
[/code]
Apache安装:
yum install apr-devel apr-util-devel pcre-devel wget gcc*–y
cd /usr/src ; wget http://mirror.bit.edu.cn/apache/httpd/httpd-2.4.27.tar.gz ;tar xzf httpd-2.4.27.tar.gz ;cd httpd-2.4.27 ;./configure –prefix=/usr/local/apache –enable-so –enable-rewrite &&make &&make install
sed -i ‘s/#ServerName www.example.com:80/ServerName www.ying.com/g’ /usr/local/apache/conf/httpd.conf
[/code]
注:如果yum安装的apr版本低了,安装apache会报错,需要更高版本,需手动安装
报错信息如下:
checking for APR… configure: WARNING: APR version 1.4.0 or later is required, found 1.3.9
解决办法如下:
[code]
wget http://mirrors.hust.edu.cn/apache//apr/apr-1.6.2.tar.gz;wget http://mirrors.hust.edu.cn/apache//apr/apr-util-1.6.0.tar.gz
tar zxf apr-1.6.2.tar.gz ;tar zxf apr-util-1.6.0.tar.gz
cd apr-1.6.2; ./configure –prefix=/usr/local/apr;make&&make install
cd apr-util-1.6.0; ./configure –prefix=/usr/local/apr-util;make&&make install
./configure –prefix=/usr/local/apache –enable-so –enable-rewrite –with-apr=/usr/local/apr –with-apr-util=/usr/local/apr-util;make &&make install
[/code]
PHP安装:
[code]
yum -y install libxml2 libxml2-devel
cd /usr/src;wget http://mirrors.sohu.com/php/php-5.3.28.tar.bz2
tar jxf php-5.3.28.tar.bz2;cd php-5.3.28
./configure –prefix=/usr/local/php5 –with-mysql=mysqlnd –with-mysqli=mysqlnd –with-pdo-mysql=mysqlnd \
–with-apxs2=/usr/local/apache/bin/apxs
cp php.ini-production /usr/local/php5/lib/php.ini
[/code]
注:如出现如下报错信息
zend_language_parser.h:317: 错误:与’zendparse’类型冲突
参照:http://libin580.blog.51cto.com/2252719/1340519
Apache+PHP整合
[code]
sed -i ‘s/DirectoryIndex/DirectoryIndex index.php/g’ /usr/local/apache/conf/httpd.conf
sed -i ‘/LoadModule php5_module/a\AddType application/x-httpd-php .php\nAddType application/x-httpd-php-source .phps’ /usr/local/apache/conf/httpd.conf
echo -e “<?php\nphpinfo();\n?>” >/usr/local/apache/htdocs/index.php
[/code]
Mysql主从配置安装:
[code]yum install -y mariadb mariadb-server[/code]
master配置
[code]
sed -i ‘/\[mysqld_safe\]/i\server-id=1’ /etc/my.cnf; sed -i ‘/\[mysqld_safe\]/i\log-bin=mysql-bin’ /etc/my.cnf
mysql -e “grant replication slave on *.* to ‘tongbu’@’%’ identified by ‘123456’; ”
mysql -e “grant all on discuz.* to ‘discuz’@’%’ identified by ‘123456’; ”
mysql -e “create database discuz;”
mysqldump ying > /tmp/discuz.sql
mysql -e “show master status; “|tail -1|awk ‘{print $1}’ 值为:mysql-bin.000001
mysql -e “show master status; “|tail -1|awk ‘{print $2}’ 值为:245
[/code]
slave配置
[code]
sed -i ‘/\[mysqld_safe\]/i\server-id=2′ /etc/my.cnf
service mariadb start
scp 192.168.77.72:/tmp/discuz.sql ./
mysql -e “create database discuz;”
mysql discuz < discuz.sql
mysql -e “change master to master_host=’192.168.77.72′,master_user=’tongbu’,master_password=’123456′,master_log_file=’mysql-bin.000001′,master_log_pos=245;”
mysql -e “slave start;”
mysql -e “show slave status\G;”|sed -n ‘/Yes/p’ |wc -l 值为:2
[/code]
Redis主从配置安装:
[code]
yuminstall -y wget gcc*
cd /usr/src;wget http://download.redis.io/releases/redis-4.0.1.tar.gz;tar xzf redis-4.0.1.tar.gz;cd redis-4.0.1;make
[/code]
master配置
sed -i ‘s/daemonize no/daemonize yes/g’ redis.conf;sed -i ‘s/bind 127.0.0.1/bind 0.0.0.0/g’ redis.conf
/usr/src/redis-4.0.1/src/redis-server /usr/src/redis-4.0.1/redis.conf
[/code]
slave配置
[code]
sed -i ‘s/daemonize no/daemonize yes/g’ redis.conf;sed -i ‘/^# slaveof/a\slaveof 192.168.77.74 6379’ redis.conf
/usr/src/redis-4.0.1/src/redis-server /usr/src/redis-4.0.1/redis.conf
[/code]
注:/usr/src/redis-4.0.1/src/redis-cli进入redis,用info命令查看主从状态,出现类似如下信息则正常
# Replication
role:master
connected_slaves:1
slave0:ip=192.168.77.75,port=6379,state=online,offset=0,lag=0
PHP+Redis整合
cd /usr/src;wget -c https://github.com/phpredis/phpredis/archive/3.1.2.tar.gz
tar zxf 3.1.2.tar.gz;cd phpredis-3.1.2;/usr/local/php5/bin/phpize
./configure –with-php-config=/usr/local/php5/bin/php-config –enable-redis;make -j8 && make install
cat >> /usr/local/php5/lib/php.ini << EOF
extension_dir=”/usr/local/php5/lib/php/extensions/no-debug-zts-20090626/”
extension=redis.so
EOF
[/code]
注:如果运行/usr/local/php5/bin/phpize出现如下报错信息(yum install m4 autoconf -y)
Cannot find autoconf. Please check your autoconf installation and the $PHP_AUTOCONF environment variable is set correctly and then rerun this script.
参照:http://www.jb51.net/article/57139.htm
Discuz安装并连接redis
cd /usr/src ;wget http://download.comsenz.com/DiscuzX/3.2/Discuz_X3.2_SC_UTF8.zip
unzip Discuz_X3.2_SC_UTF8.zip
cp -a readme/ upload/ utility/ /usr/local/apache/htdocs/
cd cp -a ./upload/* . ; cp -a ./upload/* .
chown -R daemon:daemon config/ data/ uc_server/ uc_client/ ; chmod -R 755 config/ data/ uc_server/ uc_client/
cd /usr/local/apache/htdocs/config
vim config_global.php
将$_config[‘memory’][‘redis’][‘server’] = ‘ ‘ 改成 $_config[‘memory’][‘redis’][‘server’] = ‘192.168.77.74’;
访问http://192.168.77.61/install/进行安装
对应mysql安装的数据库名和密码即可
[/code]
注:LAP2只要将LAP1上面的发布目录cp过去即可
[code]
scp -r 192.168.77.62:/usr/local/apache/htdocs/* /usr/local/apache/htdocs/ [/code]